Why Are My Tomato Leaves Turning Yellow? 3 Common June Tomato Problems with Fast Fixes
If you’ve popped out to check on your tomato plants this week and noticed a few yellow leaves staring back at you, take a breath — you are far from alone and it isn’t the end of the world. Late June is one of the most common times yellowing foliage to appear, and the good news is that most causes are easy to diagnose once you know what to look for. The trickier news is that “yellow leaves” can mean several different things depending on where on the plant they appear, how fast they’re spreading, and what else is going on around them.
This guide walks through the three most common reasons tomato leaves turn yellow in early summer, how to tell them apart, and what to do about each one this week, not next month to keep your plant healthy and on track to produce a good crop of tomatoes.
Why This Matters Right Now
Tomatoes are heavy feeders and thirsty plants, and by late June they’re usually growing fast, setting fruit, and dealing with the first real heat of the season. This combination of rapid growth, rising temperatures, and inconsistent watering is exactly when yellowing tends to show up. Catching the cause early can mean the difference between a minor adjustment and losing a chunk of your harvest.
Problem #1: Nitrogen Deficiency
What it looks like
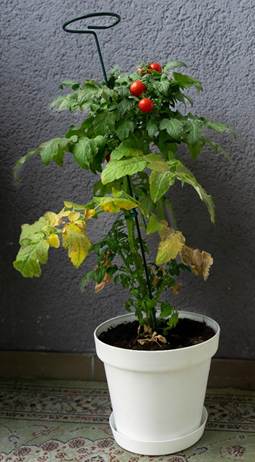
This is usually the first suspect, and for good reason — it’s extremely common, especially in plants grown in containers or in soil that hasn’t been fed in a while. With nitrogen deficiency, the yellowing typically starts on the older, lower leaves first. The yellowing is usually uniform across the whole leaf, not blotchy or patterned, and the leaf veins may stay slightly greener than the rest of the leaf for a while before the whole thing fades.
Why it happens
Tomato plants are nitrogen hogs, particularly once they start setting fruit. As the plant grows, it pulls nitrogen from older leaves to support new growth and developing tomatoes, sacrificing the lower leaves first. If your soil was amended in spring but hasn’t been fed since, by late June those early nutrients are often used up.
Say you planted your favourite tomato plant in a container back in April with a balanced slow-release fertiliser worked into the soil. By late June, after two months of growth, that fertiliser will have down and been used up. If you notice the bottom third of the plant turning a pale, washed-out yellow while the top growth still looks rich and green, nitrogen deficiency is the most likely explanation.
The Fast Fix
- Side-dress with a tomato specific fertiliser worked gently into the soil a few inches from the base of the plant or water with a liquid tomato feed.
- For a quicker boost, a liquid fish emulsion or fish fertiliser diluted in water gives plants nitrogen they can absorb within days rather than weeks.
- Going forward, plan on feeding tomatoes every 3 to 4 weeks through the growing season, since they’re in active production mode for months.
One important note: don’t overcorrect. Too much nitrogen, especially late in the season, can give you a beautiful, leafy plant with very little fruit. Tomato-specific fertilisers are formulated with this balance in mind, which is why they’re better to use than an all-purpose lawn or vegetable feed.
Problem #2: Inconsistent Watering
What it looks like
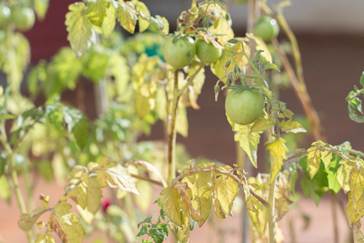
This type of yellowing tends to be more random in its pattern. You might see yellow leaves distribute across the plant rather than concentrated at the bottom, and the yellowing is usually accompanied by some leaf curling or a slightly wilted look even when the soil seems damp on the surface.
Why it happens
Tomato roots like consistency. When watering swings between very dry and very wet — a few days of neglect followed by a heavy soak, or natural rain followed by a dry stretch — the plant struggles to regulate water uptake, and yellowing is one of its stress signals. This is especially common in early summer when temperatures are climbing but gardeners haven’t yet adjusted their watering schedule to match. In our recent weather, it has been so hot, the plants have been drying out very quickly and needed watering multiple times a day.
As an example, picture a week where it rained heavily on Monday and Tuesday, then turned hot and dry for the rest of the week. If you didn’t water again until Saturday, your tomato plant likely experienced a rapid swing from saturated soil to dry soil. A few days later, you notice yellow patches developing on leaves in the middle of the plant. That lag between cause and visible symptom is normal and can make this one a little trickier to connect to its source.
The fast fix
- Check soil moisture by sticking a finger about two inches into the soil near the root zone, rather than just looking at the surface, which dries out much faster than the root area.
- Water deeply and less frequently rather than giving small amounts daily. A deep soak two to three times a week is usually better than a light sprinkle every day. If the water runs out of the bottom of the pot because the soil is so dry, which is has been here, stand the plant in a tray of water for an hour or two so the soil re-hydrates.
- Mulch around the base of your plants with straw, shredded leaves, or wood chips. This single step does more to even out soil moisture than almost anything else, since it slows evaporation and buffers the soil against quick swings.
- If you’re using a hose, switch to drip irrigation or a soaker hose where possible. It delivers water at a steadier rate and keeps foliage dry, which has the added bonus of reducing fungal disease risk.
A helpful trick for telling water stress apart from normal heat response: tomato plants often droop a little at the hottest part of the day as a protective measure, then perk back up by evening. That’s normal. If leaves are still wilted first thing in the morning before the heat has built up, that’s your plant telling you it’s genuinely thirsty.
Problem #3: Early Blight or Other Fungal Disease
What it looks like
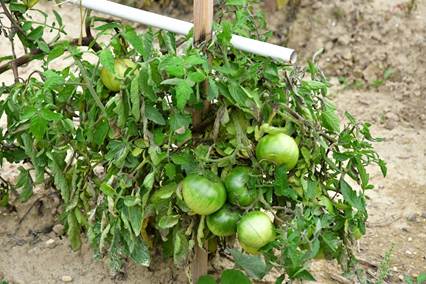
This is the one to watch closely, because while the first two problems are about plant nutrition and care, this one is a disease that can spread. Early blight typically shows up as yellowing leaves with small, dark brown spots that have a target-like, concentric ring pattern inside them. It usually starts on the lower, older leaves first, similar to nitrogen deficiency, which is part of why the two get confused. The giveaway is those dark spots — nitrogen deficiency doesn’t produce spotting, just a clean yellow fade.
Why it happens
Early blight is caused by a fungus (Alternaria solani) that thrives in warm, humid conditions and spreads through water splashing soil-borne spores up onto lower leaves. It’s extremely common for home gardeners, particularly when tomatoes are grown in the same spot year after year, when there’s poor airflow around plants due to them being too close to each other, or when overhead watering keeps foliage wet for extended periods.
Imagine you’ve grown tomatoes in the same raised bed for three summers running, and your plants are a bit crowded this year because you added an extra seedling for good measure. By late June, you spot yellow leaves near the base with small brown spots ringed like a target. Within a week or two, if untreated, more leaves nearby start to show the same pattern and the spots widen. That progression, and the distinctive ringed marks, are the telltale signs of early blight rather than a nutrition or watering issue.
The fast fix
- Remove and dispose of affected leaves immediately. Don’t compost them, since the fungal spores can survive in compost piles and spread back into your garden later. Bag them and throw them away or burn them if that’s an option where you live.
- Improve airflow by pruning some of the lower leaves and any crowded growth plus avoid overhead watering. Water at the base of the plant instead, ideally in the morning so any splashed soil has time to dry before evening.
- A copper-based fungicide or a product containing chlorothalonil, applied according to label instructions, can help slow the spread on plants that are already affected. For an organic approach, a baking soda and water spray (roughly one tablespoon of baking soda per gallon of water, with a few drops of dish soap to help it stick) can offer some protection on new growth, though it works best as a preventive rather than a cure.
- For next season, rotate where you plant tomatoes if you can, give plants more spacing, and consider mulching the soil surface so rain and watering splash less soil onto lower leaves.
Telling the Three Apart at a Glance
If you’re standing in your garden trying to figure out which of these is happening, here’s a quick way to sort it out:
- Clean, uniform yellow fade, starting at the bottom, no spots is likely nitrogen deficiency.
- Yellow patches scattered around the plant, sometimes with curling, soil moisture inconsistent is likely a watering issue.
- Yellow leaves with dark, ringed spots, starting low and spreading upward over days or weeks is likely early blight or another fungal disease.
It’s also worth noting that these issues can overlap. A stressed, underfed plant is more susceptible to disease, and a plant fighting blight may also show some watering-related symptoms simply because it’s struggling overall. If you’re not sure, address all three areas — feed, water consistency, and airflow — and you’ll usually see improvement within a week or two regardless of which factor was the main culprit.
The Bottom Line
Yellow leaves are rarely a reason to panic, but they are a reason to pay attention. Your tomato plant is communicating something, and in late June, it’s almost always one of these three things: it’s hungry, it’s thirsty in an inconsistent way, or it’s fighting off a fungal disease. Take a slow walk around your tomato bed the next time you are out there, check the leaves from the bottom up, and you’ll likely have your answer before you’ve finished your coffee. A little detective work now can save your harvest later in the summer, when those green tomatoes are finally ready to turn red. Follow the link to find out more about how to ripen tomatoes.